> ## Documentation Index
> Fetch the complete documentation index at: https://runpod-b18f5ded-docs-runpod-allow-ip.mintlify.site/llms.txt
> Use this file to discover all available pages before exploring further.
> ## Agent Instructions
> If this page is missing information, contains outdated instructions, or doesn't fully answer the user's question, use the feedback tool to report it. In your feedback, be specific about what's missing, what appears out of date, or what needs to be corrected or updated, so the docs team can act on it directly.
# Quickstart
> Write a handler function, build a worker image, create an endpoint, and send your first request. See Runpod Serverless setup and usage details.
For an even faster start, clone or download the [worker-basic](https://github.com/runpod-workers/worker-basic) repository for a pre-configured template for building and deploying Serverless workers. After cloning the repository, skip to [step 6 of this tutorial](#step-6%3A-build-and-push-your-docker-image) to deploy and test the endpoint.
## Requirements
* You've [created a Runpod account](/accounts-billing/manage-accounts).
* You've installed [Python 3.10 or higher](https://www.python.org/downloads/) and [Docker](https://docs.docker.com/get-started/get-docker/) on your local machine and configured them for your command line.
## Step 1: Create project files
Create a new directory with empty files for your project:
```bash theme={null}
mkdir serverless-quickstart && cd serverless-quickstart
touch handler.py Dockerfile requirements.txt test_input.json
```
## Step 2: Install the Serverless SDK
Create a virtual environment and install the Serverless SDK
```bash theme={null}
python3 -m venv .venv
source .venv/bin/activate
pip install runpod
```
## Step 3: Create a handler function
Add the following code to `handler.py`:
```python handler.py theme={null}
import runpod
import time
def handler(event):
# This function processes incoming requests to your Serverless endpoint.
#
# Args:
# event (dict): Contains the input data and request metadata
#
# Returns:
# Any: The result to be returned to the client
# Extract input data
print(f"Worker Start")
input = event['input']
prompt = input.get('prompt')
seconds = input.get('seconds', 0)
print(f"Received prompt: {prompt}")
print(f"Sleeping for {seconds} seconds...")
# You can replace this sleep call with your own Python code
time.sleep(seconds)
return prompt
# Start the Serverless function when the script is run
if __name__ == '__main__':
runpod.serverless.start({'handler': handler })
```
This is a bare-bones handler that processes a JSON object and outputs a `prompt` string contained in the `input` object.
You can replace the `time.sleep(seconds)` call with your own Python code for generating images, text, or running any AI/ML workload.
## Step 4: Create a test input file
Add the following code to `test_input.json` to properly test your handler locally:
```json test_input.json theme={null}
{
"input": {
"prompt": "Hey there!"
}
}
```
## Step 5: Test your handler function locally
Run your handler function using your local terminal:
```sh theme={null}
python handler.py
```
You should see output similar to this:
```text theme={null}
--- Starting Serverless Worker | Version 1.7.9 ---
INFO | Using test_input.json as job input.
DEBUG | Retrieved local job: {'input': {'prompt': 'Hey there!'}, 'id': 'local_test'}
INFO | local_test | Started.
Worker Start
Received prompt: Hey there!
Sleeping for 0 seconds...
DEBUG | local_test | Handler output: Hey there!
DEBUG | local_test | run_job return: {'output': 'Hey there!'}
INFO | Job local_test completed successfully.
INFO | Job result: {'output': 'Hey there!'}
INFO | Local testing complete, exiting.
```
## Step 6: Create a Dockerfile
Add the following content to `Dockerfile`:
New to Dockerfiles? Learn the fundamentals with our [introduction to containers](/tutorials/introduction/containers) tutorial series.
```dockerfile Dockerfile theme={null}
FROM python:3.10-slim
WORKDIR /
# Install dependencies
RUN pip install --no-cache-dir runpod
# Copy your handler file
COPY handler.py /
# Start the container
CMD ["python3", "-u", "handler.py"]
```
## Step 7: Build and push your worker image
Instead of building and pushing your image via Docker Hub, you can also [deploy your worker from a GitHub repository](/serverless/workers/github-integration).
Before you can deploy your worker on Runpod Serverless, you need to push it to Docker Hub:
Build your Docker image, specifying the platform for Runpod deployment, replacing `[YOUR_USERNAME]` with your Docker username:
```sh theme={null}
docker build --platform linux/amd64 --tag [YOUR_USERNAME]/serverless-test .
```
```sh theme={null}
docker push [YOUR_USERNAME]/serverless-test:latest
```
## Step 8: Deploy your worker using the Runpod console
To deploy your worker to a Serverless endpoint:
1. Go to the [Serverless section](https://www.console.runpod.io/serverless) of the Runpod console.
2. Click **New Endpoint**.
3. Click **Import from Docker Registry**
4. In the **Container Image** field, enter your Docker image URL: `docker.io/yourusername/serverless-test:latest`.
5. Click **Next** to proceed to endpoint configuration.
6. Configure your endpoint settings:
* (Optional) Enter a custom name for your endpoint, or use the randomly generated name.
* Make sure the **Endpoint Type** is set to **Queue**.
* Under **GPU Configuration**, check the box for **16 GB** GPUs.
* Leave the rest of the settings at their defaults.
7. Click **Deploy Endpoint**.
The system will redirect you to a dedicated detail page for your new endpoint.
## Step 9: Test your endpoint
To test your endpoint, click the **Requests** tab in the endpoint detail page:
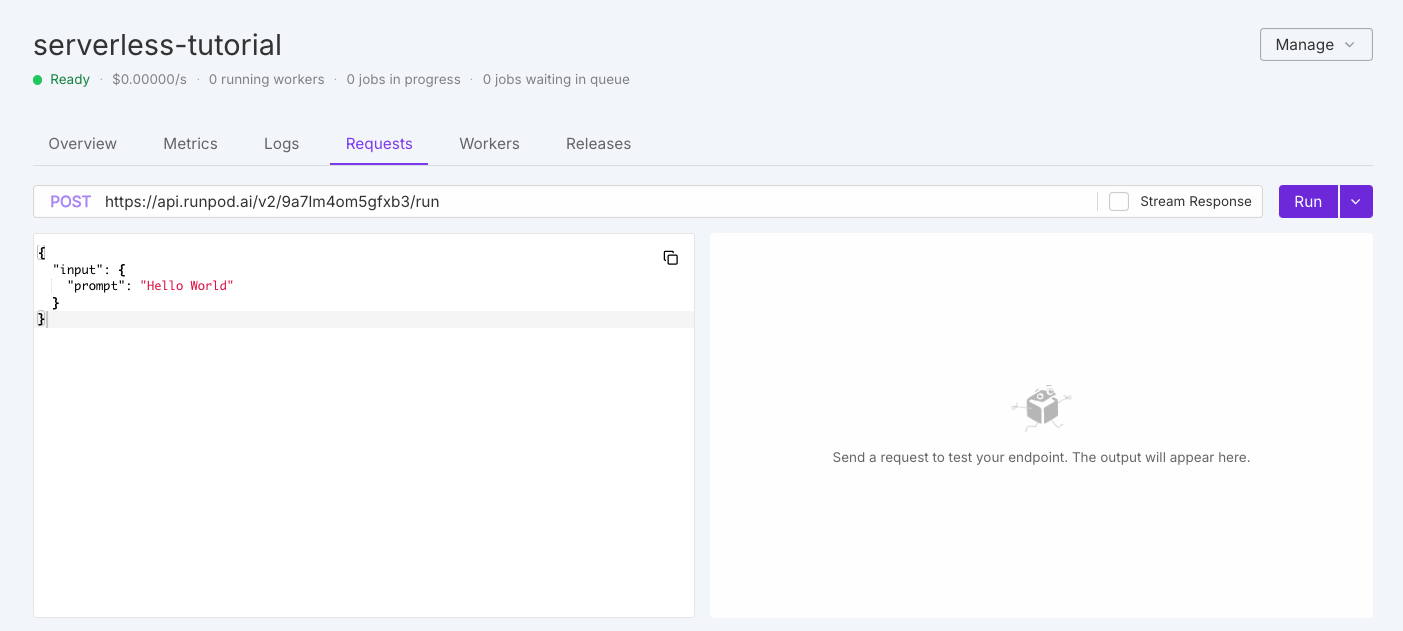 On the left you should see the default test request:
```json theme={null}
{
"input": {
"prompt": "Hello World"
}
}
```
Leave the default input as is and click **Run**. The system will take a few minutes to initialize your workers.
When the workers finish processing your request, you should see output on the right side of the page similar to this:
```json theme={null}
{
"delayTime": 15088,
"executionTime": 60,
"id": "04f01223-4aa2-40df-bdab-37e5caa43cbe-u1",
"output": "Hello World",
"status": "COMPLETED",
"workerId": "uhbbfre73gqjwh"
}
```
Congratulations! You've successfully deployed and tested your first Serverless endpoint.
## Next steps
Create more advanced handler functions.
Add AI/ML models and other dependencies to your worker.
Learn how to structure and send requests to your endpoint.
Configure and manage your Serverless endpoints.
On the left you should see the default test request:
```json theme={null}
{
"input": {
"prompt": "Hello World"
}
}
```
Leave the default input as is and click **Run**. The system will take a few minutes to initialize your workers.
When the workers finish processing your request, you should see output on the right side of the page similar to this:
```json theme={null}
{
"delayTime": 15088,
"executionTime": 60,
"id": "04f01223-4aa2-40df-bdab-37e5caa43cbe-u1",
"output": "Hello World",
"status": "COMPLETED",
"workerId": "uhbbfre73gqjwh"
}
```
Congratulations! You've successfully deployed and tested your first Serverless endpoint.
## Next steps
Create more advanced handler functions.
Add AI/ML models and other dependencies to your worker.
Learn how to structure and send requests to your endpoint.
Configure and manage your Serverless endpoints.